7.31.2013

Bourbon & Boweties

HELLO friends!

How are things going?

Things are going well over here, except for the fact, that I want to slow summer down!  It is going by WAY too fast for my liking!

We are currently at Nags Head for vacation!  I'm happy to be on vacay, BUT, know that means we are in the homestretch of summer.  So far, we've eaten lots of good food, gone for some runs on the beach, laid out, read, and already completed a 1000 piece puzzle!

Today I wanted to share a fabulous jewelry designer with you; although, if I'm completely honest, I don't really want to share because I kinda wanna be the only cool girl with this fabulous jewelry!

While reading Caitlin's blog recently, she mentioned a jewelry designer called Bourbon & Boweties.  Caitlin has great style and after seeing the picture below on her blog, I knew these bracelets were something I had to have!


Bourbon and Boweties was founded by Florida native, Carley Ochs.  She makes bracelets (and necklaces, too!) with a variety of stones in any color imaginable.  The bracelets are meant to be stacked, mixed, and matched!  I'll share a little more of her eye candy with you now...

This takes pink and green to a whole new level!

What a perfect pop for an outfit!  Loving the far right bracelet!

So luxe and chic!

She even orders actual coins for her bracelets!

Carley designed this stack for a bride, and it really caught my eye!

Knowing that Bryce and I had an anniversary coming up, I may have put a little bug in his ear, and...

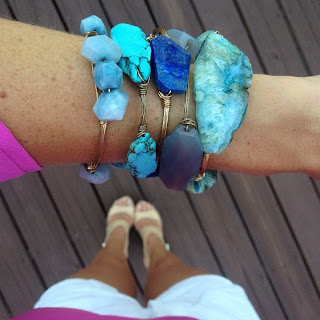
received these for our two year anniversary!

I may have mentioned that I'd love even more in all colors and styles and explained what an easy go-to gift it would be for the future...

Here's my full outfit!  

I've worn my bracelets every day since receiving them and am having fun playing with stacks!

Have you heard of Bourbon & Boweties?  Are you a fan of bangles or more of a statement necklace girl?

Have a great day!

7.26.2013

And the Winner Is....

TGIF friends!

It is beach time!  I leave early tomorrow morning so today I am tying up any last loose ends in preparation for vacation!

Today I wanted to share the winner of my Jayes Studio & Malabar Bay Giveaway...

The lucky girl who won is Kelsea from Go With All Your Heart!

Thanks to all who entered and even if you didn't win, today is still your lucky day!

Sweet Amanda, my contact from JS & MB, is offering all Sundresses and Smiles readers, just enter the code SMILE20 at checkout!

I might be scooping some things up myself.

Check out this cute stuff....

On sale for $39.00 + 20% OFF!


$39.00 + 20% OFF!

$24.00 + 20% OFF!

On sale for $89.00 + 20% OFF!

$39.00 + 20% OFF!

$39.00 + 20% OFF!

You like what you see?  

I sure do!

Head on over to Jayes Studio or Malabar Bay and treat yourself to a little something special for Friday!  Don't forget to use the code SMILE20 to get 20% off all orders!

Have a great weekend...I'm beach bound!

7.25.2013

Giveaway: LAST CHANCE!!!

Hi friends!

Just a reminder that today is your last chance to enter my Jayes Studio and Malabar Bay giveaway!  This giveaway comes with two great prizes, so be sure to click here to enter!

The lucky winner will be announced tomorrow!


Hope y'all have had a good week!

I am in major beach prep mode!  The most important preparation for the week was buying two new bikinis!  I snagged them both at Dillard's 40% Off Swim Sale and am delighted!  You can see the new bikinis below and what I plan to be doing in them...

Nags Head Vacay

Gianni Bini Postcard Bikini (here and here), Kenneth Cole Haute Wave Bikini (here and here), Lilly Pulitzer Glo Hat (here), Coach Sunglasses (here), Scout Mini Deano Bag (here)

Have a great day and don't forget to enter my giveaway!

7.22.2013

Upholstered Headboard DIY

Hello, my sweets!!

Having a good week?

Mine's going well...just getting ready to head to Nags Head with Bryce's family for vacay!  I am excited to be going, but also kind of sad, because it means that summer is coming closer to the end.

Today I am finally getting around to sharing my upholstered headboard DIY.

Those of you who follow me on Instagram, have seen the final product:

I am smitten!

Thanks to LOTS of help from my dad, the project was a big success, and not all that difficult.

So here goes, how we did it!

Materials
Plywood
   (measure to the height you'd like, and then typically the width is    1-2" wider than your mattress)
Fabric
   (we ordered 2.5 yd and had more than enough...I may use 
   what's left to make a pillow!)
Foam
Quilt Batting
Spray Adhesive
Staple Gun
Hammer
Scissors or Exacto Knife

Steps
1.  Measure your bed frame and decide the dimensions you would like your headboard to be. Remember that once you have added foam, batting, and fabric it will be slightly wider than the actual plywood.  At Home Depot, once you have selected your plywood they will cut it to the dimensions you would like.


2.  Spray your plywood and foam with spray adhesive.  Place foam on top of plywood and press down firmly to attach.


3.  Staple foam around edges of wood.


 We found that it was beneficial to hammer the staples in after using the staple gun, to ensure that they would stay put.


At the corners, we used a knife to cut a square out of the foam so that there would not be excess fabric and the corners would lay flat.


4.  Repeat process, covering the foam with batting.


Now the next step is where it gets interesting...adding you fabric!  If you have a small, all-over print, this step will be easier, however, my fabric had a larger  print so you had to be exact with fabric placement.

5.  Lay fabric out.  You may have to play with it to make sure that it is placed in the way you'd like.  For example, I knew that once I added the pillows, etc, I still wanted to be sure that I was able to see the full print above them.


6.  Staple along the top, being very careful to keep the fabric in place (this is where having a smaller design or a solid color, would make things much easier!

Frustration began to set in here, because it is difficult to get the little staple through fabric, batting, foam, and finally into the wood.   We therefore, modified our strategy a bit....

We found that if Bryce and I held the board in place and provided pressure, it made it easier for my dad to get the staples in.

7.  Staple remaining edges, making sure to pull fabric tight around edges and at corners.

To make corners tight, we folded fabric in and laid it down nicely, as shown above.

8.  Install!

Because my bed sits in front of a window, we could not mount the headboard to the wall, like many other DIYs suggest.  My dad, therefore, used the remaining plywood (from the original piece Home Depot cut) to make legs that could be attached to my bed frame.


full view of the legs

bolted to the bed frame

Once installed, my dad drilled the legs to the headboard for extra stability.

9.  Style!
I am so thrilled with how this project has turned out!


I do have to add one more time, a HUGE thank you to my dad!  None of this would have happened if it weren't for his help and he ended up with more than he bargained for-- since seeing us work on mine, my mom has asked that he make another for their bed at the new house!

My next project is to make a bed skirt, which Bryce's mom has agreed to help me with.  This project is off to a slow start only because I can't decide on a fabric for it.  Any suggestions?

Have a great day!

Be sure to enter my giveaway here if you haven't already!

7.19.2013

Big Meadows

Hey chickies!

Happy Friday!

Today I'm going to share another of our weekend getaways this summer.

At the end of June we visited Big Meadows.  Big Meadows is a campground in the Shenandoah National Park.  They have camping areas, rooms to stay in, cabins, and a main lodge with a common area, tap room, and restaurant.  Each year, one of Bryce's dad's business colleagues hosts his dad and step-mom for the weekend and this was our second year being invited along as well.

When we first arrived, D&A, the hosting couple, had a beautiful spread waiting for us!

We sipped on cocktails and snacked the first few hours of our visit.


These gorgeous views were right outside our room!

After lots of grazing, we made our way to the main lodge for dinner.

I couldn't resist snapping a picture with this bear after dinner!
(last year, we saw actual bears on our hike!)

The next day we fueled up with a great breakfast in the lodge, before heading out on a hike.

The pancakes were de-lic-ious!

We stopped by the Big Meadows visitor's center to help decide which hiking trail to take.

The visitors center was full of cool history--for example, we learned that good fly fishing is what convinced President Hoover to make Virginia the location for the East Coast's first national park.

I loved this tunnel filled with woods scenes and quotes about the wilderness.  My favorite quote was:  "The love of wilderness is more than a hunger for what is always beyond our reach; it is also an expression of loyalty to the earth." -Edward Abbey

While at the visitor's center we picked our hike:  A trail that would take us to Rapidan Camp, the location of President Hoover's summer home!

B's dad, leading the way!

I loved this tree!

:)

Bryce's stepmom secretly snapped this picture and I love it...I believe I was showing Bryce a crawfish I had found!


Once we made it to Camp Rapidan we found a place to rest and eat a picnic lunch before exploring!


This quote, by Hoover's wife, reminded Bryce of us, so I decided to snap a picture of it.  We definitely are two people with our own independent spirits, haha!

Unfortunately, cameras were not allowed inside Hoover's personal cabin, so I wasn't able to take any photos of it.  The cabin was really cool though and had the HUGEST fireplaces!


When we got back from our hike that afternoon, I took a much needed nap before heading to the lodge for our last night's dinner.

The lodge was filled with seating and games.

I also loved the ceilings!


My favorite thing on the menu were these sweet potato fries served with lemon aioli!

AND my other favorite part of the  menu was THIS mudslide dessert.  It was a brownie topped with ice cream, Kahlua, Baileys, hot fudge, and whipped cream!  Heaven in your mouth!

After dinner we were all thoroughly exhausted and hit the sack early.  Bryce and I had decided to go see the sunrise, just the two of us the next morning, so we especially had to get to sleep early.

 The next morning, our alarms were set for 5:00 am and we made our way to the Big Meadow!
Sleepy Eyes!

The sunset was spectacular and such a special time for just the two of us!


A little after six, we made our way back to the cabin for a little snooze until breakfast!

For our last breakfast before saying farewell, D&A had planned a delicious blueberry pancake breakfast.  We headed to the campsite to use their grills!

This took "tailgating" to a new level!

We even had coffee from Cafe du Monde in New Orleans!

Bryce and his dad were in charge of the meat!

Buckwheat Pancakes with fresh blueberries from D's garden!

YUM!

With full bellies we said goodbye to D&A and are already looking forward to next year's Big Meadows trip!

Do you enjoy the mountains?

Have you had any fun weekend getaways this summer?

Have a great weekend and if you haven't already, click here to enter my giveaway!