12.14.2012

DIY Ribbon Christmas Tree

HAPPY FRIDAY FRIENDS!

The countdown is ON!  Exactly one week until Christmas break for me...wooohooo!  The kids have been so excited about the holidays, which has truly tested my patience this week, haha.  A break is definitely overdue!

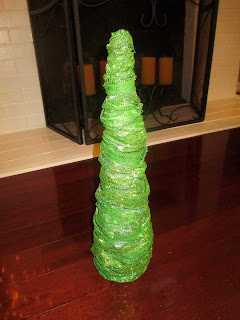
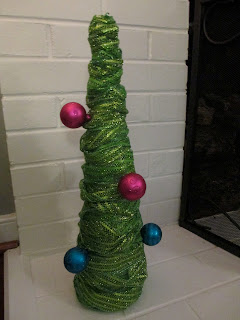
Today I have the most adorable Christmas craft to share with you:  A Ribbon Christmas Tree!

Before I give you the directions, I'll give you a sneak peek of the final product:

Isn't it darling?!?

And...good news-- it was SUPER easy to make!

You only need 4 things to complete this craft:

Styrofoam Cone and 2.5" Wired Ribbon of Choice
My teacher friend JAB and I made these together, that's why there's two of each!

 Headpins
I found these in the jewelry-making section of our craft store.

Ornaments/Garland/Ribbons/Etc to decorate tree

And now for the steps....

1.  Twist ribbon into ringlets and pin securely at the bottom of the cone.


I used multiple pins in this first section to make sure it was secure from the start.

2.  Continue to twist and pin, making your way up the cone.

I did about two layers of ribbon around the cone before moving up for a new section.

3.  Make your way to the top of the cone and cut the ribbon.  Pin down the last little bit at the top.

Ready for some ornaments!

4.  Decorate!

We bought these little ornaments in sets. They had wire threaded through them, so I simply removed the wire, replaced it with a pin and stuck the ornaments in using the pins.  A glue gun would probably also do the trick!

5.  And of course, top it off with a bow!!!

We tested them out on JAB's mantel and they looked great--we're considering each making another so we'd have pair!

This craft was super easy and we finished in no time!  The only hard part was pushing in the pins--my fingers were sore by the end!  We saw a similar tree made of deco mesh, that was made into a topiary using a wooden dowel and terracotta pot.  We are considering transforming ours into these and spray painting the pots gold...thoughts?

I also love that this craft is super versatile!  JAB and I thought it would be fun to make trees with hot pink or white ribbon as well.  You could also go with more traditional colors.  You can really fashion it to match any decorating style!

Have you gotten crafty this Christmas season?

Have a fabulous weekend!

I'm excited for mine...JAB and I are having a spa day tomorrow and then Bryce and I have a Christmas cocktail party tomorrow night!

11.30.2012

Hana Air Dryer Review

A big old TGIF, today friends!!!

The last few days have really dragged on--I am ready for the weekend!

I still have lots to post and update you on my life, but life these days doesn't leave much time for blogging.

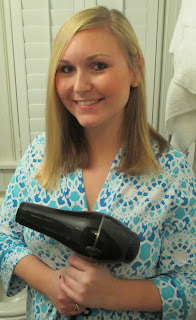
Nonetheless, today, I'd like to share a product review with you:  the HANAair Professional Hair Dryer.

I'll preface the review with a little hair history.  I will admit, that I am very lucky to have naturally straight hair that tends to be really healthy.  When it comes to hair dryers, though, I go CHEAP!  I always buy something on the lower end, with a high speed and high heat.  I like something that will get the job done fast.  Not the healthiest for my hair (I know), but usually during the week I let it air dry so I don't mind drying it on high heat every now and then.  Therefore, when I first heard from Brian of Misikko, I wasn't convinced.  I didn't see how a pricier hair dryer could really make much difference.  I accepted the offer to review the hair dryer but wasn't sure how it would all go.

When the package arrived, I excitedly opened it to see not only my new hair dryer, but also lots of other goodies!

Well, friends....

I WAS PROVEN WRONG!

THIS HAIR DRYER IS AWESOME!!!

After using it I was amazed at how smooth and shiny my hair looked--it looked as if I had both dried and straightened it!

Please excuse the bath robe!

Another feature I love about the dryer is all of the settings it has:  3 Heat Speeds, 2 Fan Speeds, and even a Cool Shot button!  When I dry my hair, I really don't want it to take that long, and with the hot and high speed my hair is not only dry, but gorgeous after just a few minutes!  The cool shot is also a great feature to help boost hair's shine.

Can you believe that shine?

Since using the Hana Air Dryer, I have gotten excited about drying my hair, knowing that the end result is always going to fabulous!

AND...guess what!?  It's your lucky day!  Misikko is offering the hair dryer at more than 40% off!  Click here to purchase!

What are your favorite hair products?

Have a wonderful weekend!

11.19.2012

And we have a WINNER!!!

Happy Monday friends!!!

I am so pumped for a short week and some special time with family for Thanksgiving!

Today, I'd like to congratulate sweet Jess, of Just Rainbows and Butterflies for winning my Pea Pod Paper & Gifts Fornash Giveaway!


Thanks to EVERYONE who entered the giveaway and to my new followers!  I hope to be back this week to update you on my recent trip to the Waterfowl Festival in Easton, Maryland!

Have a GREAT day!

11.14.2012

Last Call!

Hey chickadees!!!

Just a little reminder that TODAY is the last day to enter my fantastic, fabulous, fun Fornash giveaway!

Wouldn't you love to be the owners of these gorgeous baubles?


Click here to enter by midnight!

11.02.2012

Pea Pod Paper and Gifts GIVEAWAY!!!

Happy Friday chickies!

I think every week should start on Hump Day...my two hurricane days off on Monday and Tuesday provided a great dose of relaxation!

I'm so excited to be posting today, because, as I mentioned Wednesday, I have a fabulous giveaway to share with you.

The giveaway today is from Pea Pod Paper & Gifts, an adorable online boutique!  Not only is this giveaway from an adorable site, but it is FORNASH!!!  I love, love, love everything Fornash.

One lucky reader will win the Fornash Cabana Tear Earrings and Tizzy Bracelet.

Cabana Tear Earrings
SWOONING over the Amethyst--they would be the perfect pop of color with neutral fall ensembles!


Tizzy Bracelet
I actually own this bracelet myself (you know I'm all over the tortoise) and have worn the heck out of it!  It is chic, but also youthful and fun!


And now, drumroll please, it's your lucky day! These Fornash goodies could be yours...Susan, the owner of Pea Pod is even nice enough to let you choose which color you'd like!  The Cabana Tear Earrings come in five jewel colors and also six fun colors.  The Tizzy Bracelet comes in six colors!

Which colors would YOU choose?  Pop on over to Pea Pod Paper & Gifts to find what you like best!

To enter this giveaway, please use the Rafflecopter Widget below!

This giveaway will close at MIDNIGHT, WEDNESDAY, NOVEMBER 14 so hurry and enter now!

a Rafflecopter giveaway

GOOD LUCK!!!

P.S.--The exciting news and Susan's generosity isn't over yet...

The holidays are just around the corner...maybe you noticed some trinkets that would make wonderful gifts (for others of YOURSELF) on Pea Pod Paper & Gifts?  If so, I have a great deal for you.  For the duration of the giveaway Susan will offer 10% off and free shipping with the special code SUNDRESS .

10.31.2012

Exciting News!!!

Hi Readers!!!

HAPPY HALLOWEEN!!!

I've got some exciting news...a little birdie told me there would be a giveaway here on Sundresses and Smiles Friday!

Just wanted to pass the message along so you can be sure to stop by!

It won't disappoint, it's from this adorable site...


See you Friday!!!

10.25.2012

Wowee!!! A Month!!!

A huuuuge HELLLOOOO!!!!

How has a month gone by since my last post?

I have been so detached from the blog world.  Life has just gotten in the way!  The last month I have been busy, busy with my kindergartners, weddings, an upper respiratory infection, and computer issues, just to name a few.

I'm still here though and really want to get back into blogging.

That being said, I have had a few people email complaining about the fact that I have stopped blogging.  I'd just like to clarify why I blog.  I blog for ME--it is a wonderful creative outlet and has also been an amazing way to connect with likeminded people.  I am not, however, going to be a slave to the blog.  When things get crazy, the last thing I need is for the blog to be just "one more thing" I have to get done.  So when I am gone, please know, I'm coming back.  If I ever decide to stop blogging, you'll be the first to know...so please be patient with me in the meantime.  :)

For now I'll leave you with a few pictures of happy moments during my blogging absence:

ECS's Wedding!

Flowers from Bryce's Mom
These were all picked and arranged from her very own gorgeous garden!

Y'all know I never post OOTDs, but I couldn't resist this one!
This outfit just made me happy--pink, polka dots, and stripes all in one outfit!

Hope you're well and to find some time to stop by and say hi on your bloggies soon!!

9.21.2012

Classroom Tour!

TGIF!!!

Wow, I am officially done with week 3 with my kindergartners.  All week, I have been telling them that they will be "kindergarten pros" by Friday and I really have noticed a change in them this week.  They seem to be really getting the routines now!

I've waited to post classroom pictures, because I wanted to get some student work up around the room first.  So without further adieu, welcome to Room 100E!

Our school's theme this year is Surfing the Seas of Learning, so we have this in the kindergarten hallway!

This is the view as you approach my classroom!

We all were able to put garden flags outside our classroom...the only rule was it couldn't say "5 o'clock somewhere" (haha) and I just love my butterfly flag!

This is as far as the surfing theme goes in my class, while I think it's a cute theme, I'm not much of a surfer chick!

This is the view from the doorway!  Each student's name is hanging on a red dog!

My desk!

This is my desk...the Lilly file folders, a gift from CAE, add a little happy to each day!

I loved this apple cupcake one student brought me on the first day!

My personal classroom library!

Reading Table

This is where the small group magic happens...
(All you teachers really know it is tough to make magic happen when you have 18 other kids in centers around the room!)

Back Wall and Student Hooks & Cubbies

Birthday Graph
I love the way this turned out...I simply used a free clipart birthday cake and wrote each student's name and birthday on it.  Then they got to color it in and we graphed it together on the floor as a class.  The final step was then hanging it on the wall!

Reading Nook

Spaghetti Letters:  The Reading Station I'm most proud of!  Use yarn for letters (aka spaghetti) and red pom-poms for dots (aka meatballs)!

Word Wall and Colors I made!

This is my favorite spot in the room!
My parents' found this antique rocking chair in the attic and my dad gave it a make-over.  Bryce and his mom made me the adorable cushion!

We've been working on the letters E and R!

Calendar Space

Dry Erase Board

Let's talk Potato Heads...I got the idea on Pinterest to use potato heads as a class incentive.  Students earn parts of the potato head by doing a good job collectively as a class; when they're all filled up the class earns a reward!

Bee Bulletin Board:
1.  "BEE"havior!
2.  The 3 "Bees" (Class Rules):  "Bee" a good friend.  "Bee" a good listener.  "Bee" in control of your body.
3.  Busy Bees! (Class Jobs)

Art Center
In the back I have my reading groups (sharks, turtles, crabs, starfish) displayed using student pictures and also display student work.
I love the students' finger painting inspired by Brown Bear, Brown Bear!

Good manners are a must in my classroom!

Hope I didn't bore you with all these pictures...I just LOVE my classroom and of course my precious kiddos!  Teacher friends...if you have any questions feel free to shoot me an email (sundressesandsmiles@gmail.com) and I'd be happy to answer them!

How's life treating you?

Hope you have a great weekend!

9.07.2012

Gallery Wall Reveal

Hello readers!

TGIF!!!  I have officially made it through my first week in kindergarten!  My class is filled with cuties and for the most part they are wonderful and well-behaved (definitely still working to train them on routines and such, though, hehe!).

I hadn't done an apartment update in a while, so I thought I'd share my gallery wall with you today.

WARNING:  This post is chocked full of pictures...but I'm very, very proud of my wall and couldn't bear to spare any details!

As y'all know my bedroom in the apartment had two large blank walls so I decided to fill one with a gallery wall.  The wall I chose is the one directly across the door, so the gallery wall is one of the first things you see when approaching the room.  Before explaining the process, I'll give you  a quick peek at the final product:


It was quite the process, but I had lots of fun.  My first step was brainstorming what to put on the wall.  I literally wrote down a list with all sorts of things I thought would be good.

Then the real fun began.  I was on a mission!  The next day I began collecting and organizing the different things I wanted to include.  I then played with lots of different layouts until I found just the right one!

As I played with the different layouts, I focused on symmetry and balance.  I wanted to have matching pairs (like my gold frames, the cork boards, and black frames) as well as individual items that were placed in a way that maintained balance.


Finished product, except I exchanged the white frame (bottom left) for a black one that matches its counterpart (bottom right).

Next, because I am a bit OCD, I measured everything and made a precise diagram, complete with measurements, showing exactly how I wanted everything to be placed on the wall.

My dad (who so nicely was the one hanging the wall) got a kick out of this!

And of course, the last step was actually putting it up!

We first put two lines of painter's tape on the wall according to the width of the gallery wall.

Next we put up the first thing:  My Virginia Sign (a present from ALG).

My bed became quite the work space!

We then proceeded to hang everything else according to the center point.  

I tweaked my measurements some because seeing the width on the wall made me realize I wanted it to be just a bit tighter!

VOILA!

Now I'll go through and show you the specific pieces of the wall and share some tips along the way!

Left Side:
Starburst Mirror (I've had this in my room since I was a little girl), Framed Quote, Corkboard, Framed Envelope, Framed Quote, and Framed Postcard of UVA Rotunda
-Fun Tip: I wanted to have cute pushpins for my cork boards, but couldn't find anything I loved around town.  I ended up making my own by simply super gluing jeweled buttons to thumbtacks.-

Middle:
Virginia Sign, Monthly Sign, Ceramic Tulip, Green Sign

Right Side:
Framed Quote, Corkboard, Framed Fish Stationery, Framed Quotes

And here they are up close!

It's hard to pick a favorite part of the wall, but this is probably it--This envelope contained the first love letter Bryce ever sent me and I am absolutely smitten with the dogwood flower he drew on it! 

I absolutely LOVE this quote:  "I don't want to get to the end of my life and find that I just lived the length of it.  I want to have lived the width of it as well." -Diane Ackerman
-Fun Tip:  The cute lemon border is simply Lilly stationery with the inside cute out and glued to a white picture frame!  Green gingham ribbon was also added by me!-

Rotunda Postcard--UVA's main icon is the rotunda and there's lots of art depicting it, but I fell in love with this architectural look at the rotunda and bought this postcard when I was in Charlottesville for Foxfield this past spring.

I thought this quote was absolutely beautiful: "The Sea, once it casts its spell, holds one in its net of wonder forever." -Jacques Cousteau
This pearl frame had been a gift from my best friend, ARS, last year and I had been waiting for just the perfect thing to fill it!

Kate Spade said it best:  "Playing dress-up begins at age five and never truly ends."
-Fun Tip:  You don't have to break the bank, this frame, as well as the two black frames at the bottom of the wall, and this frames counterpart (the shabby chic mint frame) all cost $3.99-$4.99 from Christmas Tree Shops.-

You know how much  I love Richmond, so I thought this would be a great fit for the wall:  "Southern Belle Secret #5 Virginia:  Monument Avenue- one of the prettiest streets in the country"
-Fun Tip:  I printed most of these quotes myself from the internet using photo paper.-

I love this fish and had him hanging in my bedroom at my parents' house as well--he's from a free set of stationery we received from the Chesapeake Bay Foundation ages ago!
I also loved the look and words of this Audrey Hepburn Quote: "The best thing to hold onto in life is each other."

Sine "Print"--Sine is where Bryce and I met and this "print" is actually just a calendar page by Eliza B. Askin (a favorite Richmond artist) I cut out and framed.  The pink "matte" is scrapbook paper and the tan "matte" is a dish towel!

I love these two little decroations!  I bought the tulip years ago at Shops at 5807 and the sign was a gift from my roommate first year of college:  "Whoever said money can't buy happiness...doesn't know where to shop"!!

And finally, I just love my ever-changing month sign.  I simply cut pages out of my old Lilly planner and put them in the frame.  I had a hard time changing to September's page--this August one might be my very favorite!

Did you make it all the way here to the end?  If so, thanks for joining me in my excitement for my gallery wall!  It was really so fun to put together and is such a great display of things that are special to me!

Do you have a gallery wall in your home?

How do you display sentimental treasures?

My final project for the apartment is to make my headboard and bed skirt, but those take the back burner to school right now!

Have a fantastic weekend!